Description: If you want to convert projects from FCP to MKV, MP4, WMV, AVI, MOV, MPG, VOB, FLV, etc. for playing, burning, editing, sharing and so on, this article will give you instruction. Follow this article to find the solution.
Final Cut Pro is a professional editing program developed by Macromedia Inc. and later Apple Inc. Many Mac users prefer to use FCP to create individual videos for sharing with family and friends and export videos as Apple ProRes 4444, Apple ProRes 422 (HQ), Apple ProRes 422, Apple ProRes 422 (LT), and Apple ProRes 422 (Proxy).
Do you want to convert FCP projects to MP4 or MKV for playing them in some mobile devices, tend to convert to WMV or AVI for sharing with your friends who use Windows Media Player on PC, or transcode to H264 MOV for more portable devices? When you search a solution in Google, you will find much third-party software can do conversion.
Free software like Handbreak may be your first choice. After trying it, you will be disappointed that the output video looks fine but the audio is out of sync. At this time, Turning to Pavtube HD Video Converter for Mac will bring you good-quality output videos without any video and audio out of sync issue. And easy-to-use workflow and fast conversion speed will provide you great customer experience. Now let me show you how to convert FCP projects.
Note: Trial version before purchase can help you to test all the functions, but there will be Pavtube watermark in the middle of output videos, which is the difference form retail version. Download it according to different Mac OS.


Make preparation: Export videos with Final Cut Pro
When you have finished editing the video with Final Cut Pro, export it to MOV files. Hit “File” option and then go to “Export”, choose QuickTime Movies.
1. Import FCP projects
After you get the FCP output files successfully, launch HD Video Converter for Mac and then choose to locate the projects into the program by clicking “Add video” or “Add from folder”.
And there is an easier way that is to directly drag the projects into the program, which allows you to load multiple projects at one time. It loads files quickly and the dialogue box of progress will give you timely state of loading.
Tips: If your videos are different segments and you want to joint them into one output file, at this time, you can go to select the desired segment titles and then check Merge into one file button on the interface. In this way, you will get a big combined file.
2. Choose video format for output
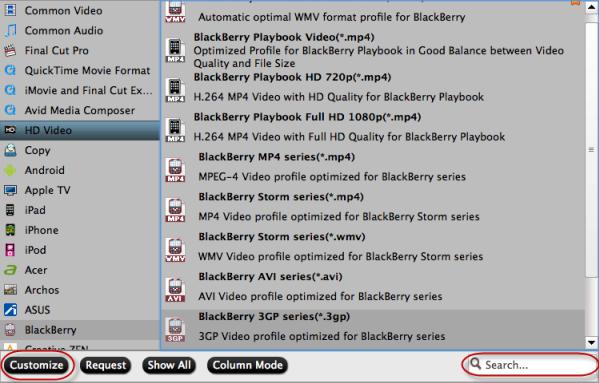
This program offers you a variety of video formats in the “Format” dropdown list. Many common portable devices and editing software are listed. If you do not want to choose the devices, “HD Video”, “Common Video” and more options can give you more choices. Just choose the one you need from the list.

Tips: Sometimes you may think too many video formats listed is inconvenient because some options you won’t use at all. Don’t worry; you can remove some formats and customize the list according to your own need.
3. Adjust the output parameters (Optional)
This step is optional. If you are not good at settings, keep the system built-in settings will as give you great target videos. However, if you want to change codec, bitrate, frame rate, and so on, here is right for you. Click “Settings” to set them.
4. Convert FCP projects.
Before starting conversion, you may need to set the location of output videos in Browse. Now, hit the “Convert” button to get started. Then Open output folder to get the generated videos.
Tips: If you need to convert so many videos with big file size, you can not bear waiting for a long time when you are in a hurry to go out or go to bed. Just one click will solve the problem for you:
Go to check “Shut down the computer after conversion” and then you can go to do everything else. The computer will shut down automatically after completed conversion.

It is an all-in-one program that many other videos besides FCP projects can be converted with this program.
What’s more, you can free burn FCP projects to DVD on Mac by Pavtube Free DVD Creator for Mac. (Here is a guide)
You can have a try when you need. Now please enjoy the output video.
 tháng 8 21, 2013


Không có nhận xét nào
Đăng nhận xét